


Slabs reinforcement

Several Revit applications are running. Choose one:
| Name | Discount | Total value of individual orders | Total value of corporate orders |
|---|---|---|---|
| Regular user | 0% | ||
| 3% discount | 3% | $84 | $180 |
| 5% discount | 5% | $120 | $360 |
| 7% discount | 7% | $180 | $600 |
| 10% discount | 10% | $300 | $900 |
| 15% discount | 15% | $360 | $1 200 |
| Partners | 30% | ||
| BIM Consulting | 50% | ||
| Super VIP | 100% |
Icon


Related news and articles
- New plugin for Revit. Slabs reinforcement
- Revit. Reinforcement. Rebars parameters, complex shapes of holes in the slab and other novelties
- Calculation of the length of anchoring and overlap
- Revit. Reinforcement. Model bar diameter
- Revit. Sloping slab reinforcement, mirroring meshes, and other changes
- Revit. Slabs reinforcement. Tied stirrups in the framing of holes
- Revit. Reinforcement. New algorithms of reinforcement creation, settings storage and other new features
Using
Plugin allows you to process both individually selected slabs, and all slabs in the view or in the document. The main reinforcement of the slab can be performed as separate rebars, or area reinforcement. The analysis of holes is made from the geometry of the slab itself and does not depend on the used families. Plugin can work even on an empty template.
The main window of the plugin is divided into three zones: selection and analysis, reinforcement settings for slabs and final settings and starting the reinforcement process.
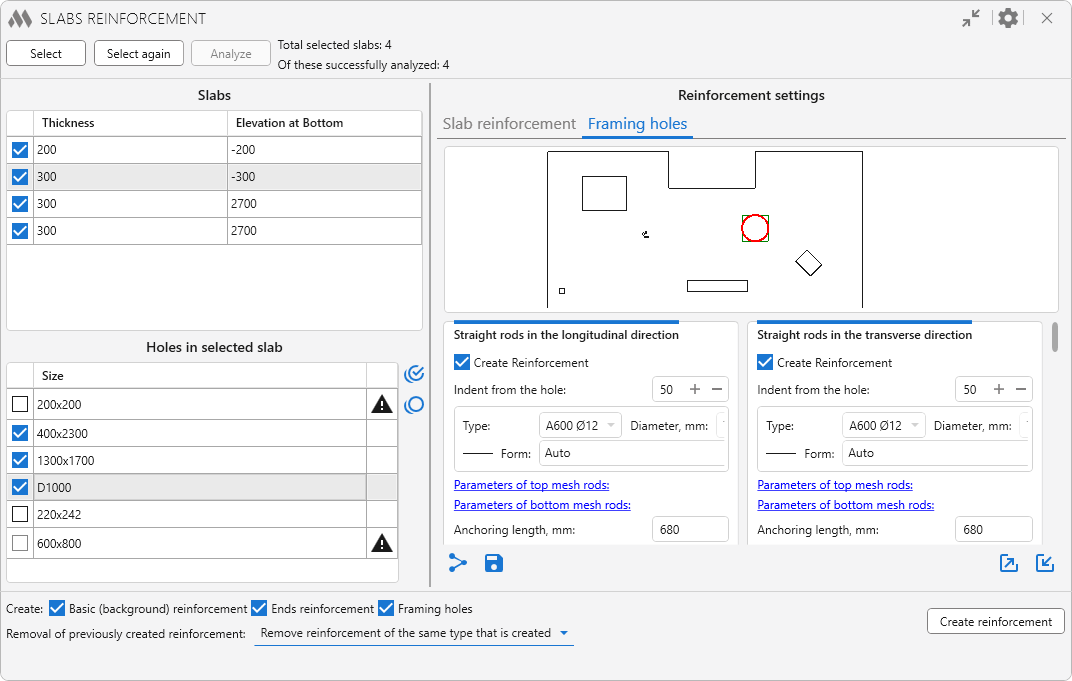
There are options in the window title:
 – collapse window contents
 – general plugin settings:
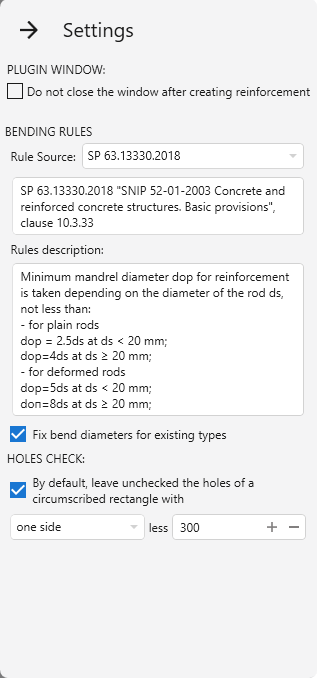
In the group Bending rules the source of rules for rebar bending is selected: SP 63.13330.2018 or EN 1992-1-1. Below is the description of rules from the selected norms.
If the option Fix bend diameters for existing types is enabled and appropriate types of rebars are found during operation, their bend diameters will be checked and corrected according to the selected standards. When creating new types of rebars, in the case no suitable ones are found, the diameters are always checked and set.
In the group Holes check there is an option that allows unchecked in the list a hole, whose circumscribed rectangle has one or all sides less than the specified value.
Selection and analysis
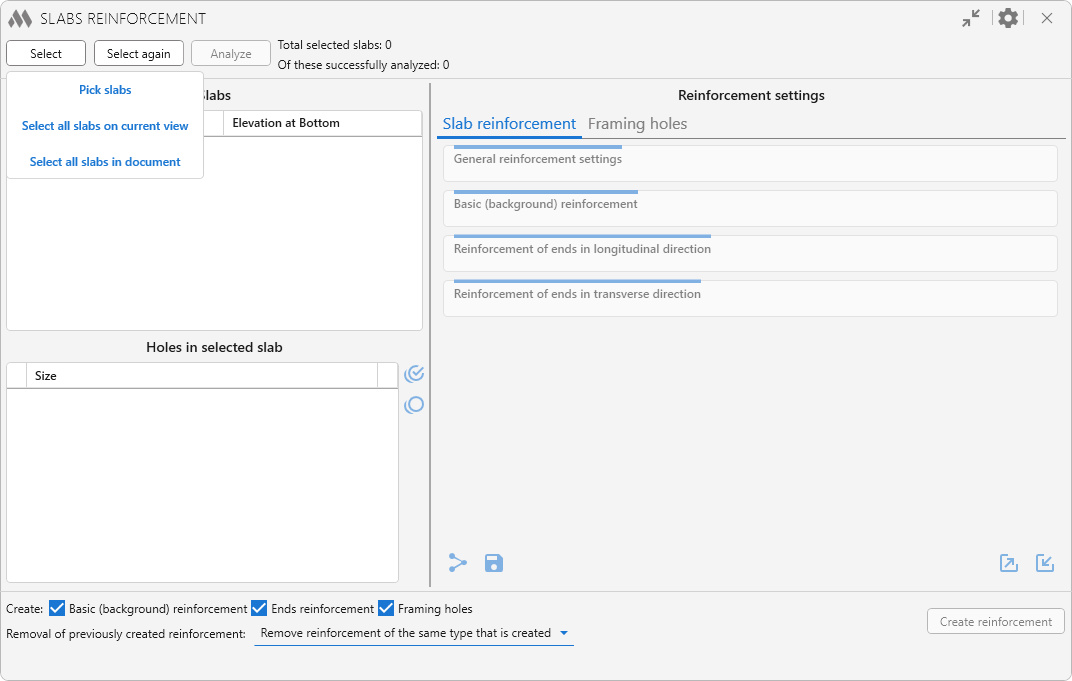
Work with the plugin starts with selecting the slabs to be reinforced. To do this, click the button Select and then choose one of the options in the drop-down window: Pick slabs, Select all slabs in current view or Select all slabs in document.
Only slabs with the enabled property Structural get into the filtering of the selection. The number of selected slabs is displayed at the top of the plugin window.
The button Select again allows you to reselect the slabs that were processed in the current view when using the plugin.
Next you need to start the analysis of geometric and parametric data of selected slabs, including hole analysis, using the button Analyze. The number of successfully analyzed slabs is displayed in the upper part of the plugin window.
Slab Reinforcement Settings
The direction of reinforcement in the slabs is set based on the given direction of span direction in the slab sketch. The direction of the segment indicating the span direction corresponds to the direction of the longitudinal reinforcement in the slab reinforcement
On the left side of the zone are two tables. The top is filled with slabs that have been successfully analyzed. For each slab, a flag is checked by default in the list, meaning that for this slab, reinforcement is required. The bottom list is filled with holes for the selected slab. For each hole for which it is possible to create a border, a flag is set by default to indicate that the hole needs to be framed. If the framing of a hole of a certain shape is not provided by the plugin, the checkbox will be inactive, and the corresponding icon with a pop-up message will be displayed for the hole. A warning icon is also displayed for holes smaller than 300 mm that are not recommended for framing. To the right of the hole list there are buttons to check all openings available for processing in the list  and to uncheck all openings in the list
 .
On the right side of the zone are tabs for specifying settings for a particular type of reinforcement. The contents of the reinforcement settings will be discussed later.
On the Framing holes tab there is also a preview field of the outline of the plate with the contours of the holes. The hole selected in the list on the left is highlighted in the preview field. You can also zoom and move the image, and the Zoom all command is available in the context menu of the field.
There are buttons at the bottom of each tab:
 – allows you to copy the reinforcement settings of the current tab to the checked slabs (for the Slab Reinforcement tab) or checked holes (for the Hole Framing tab).
 – allows to save the current reinforcement settings as default reinforcement settings.
 – allows to export reinforcement settings of the current tab to an xml file or saving them to the reinforcement settings storage.
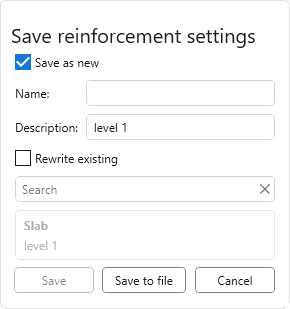
To save the settings to an xml file, simply click Save to file, the name of the settings can be entered in the opened explorer window.
To save the current settings to the storage you should choose one of two saving options:
- Save as new – to save the current settings you need to set Name and Description (optional) of the settings.
- Rewrite existing – current settings will be saved with the name of previously saved settings selected from the list.
Next, to save the settings to the storage you should click Save.
 – allows you to load reinforcement settings from previously exported xml file of reinforcement settings or from the reinforcement settings storage.
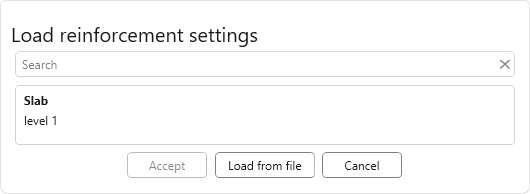
To load the settings from the xml-file you should click Load from file. To load settings from the storage it is necessary to select the required setting in the list and click Accept.
Final settings and starting the reinforcement process
In the row Create: you can specify what type of reinforcement will be created for checked slabs and holes: Basic (background) reinforcement, End reinforcement, Framing holes.
Removal of previously created reinforcement – this option allows you to remove the reinforcement created by the plugin (reinforcement of the same type that is created or all previously created reinforcement), if you want to recreate it.
Create reinforcement – start creating reinforcement of checked categories for checked slabs and holes.
Slab reinforcement
The settings are set for the single slab selected in the slab list on the left side of the plugin window.
General reinforcement settings
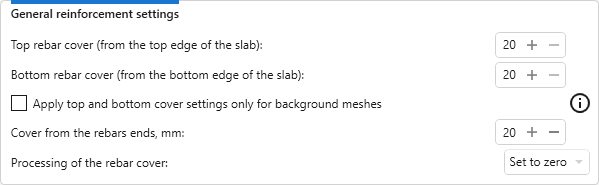
In this group, the basic settings for reinforcement are set, which are used when creating any type of reinforcement.
When creating reinforcement, the rebar cover in the slabs is pre-set to 0 in order to avoid uncontrolled shear of the reinforcement when creating. Option Processing of the rebar cover – sets the option of setting up a rebar cover in the processed slabs. When creating background reinforcement by "Area Reinforcement" when selecting the Set to zero option, the bars of the main reinforcement will be cut by the holes with zero protective layer, in this case it is recommended to select the Set based on the reinforcement settings to create a protective layer of the specified value.
Basic (background) reinforcement
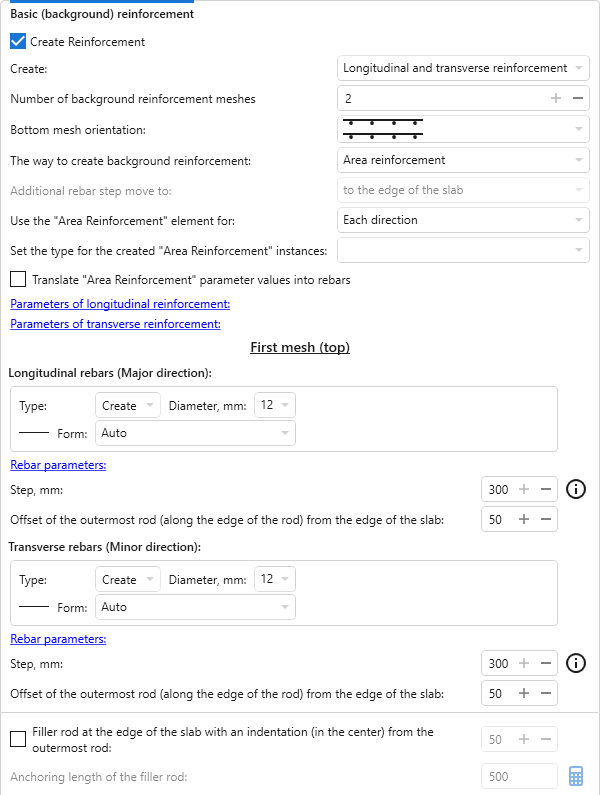
In this group, the background reinforcement of the slab is configured.
Create Reinforcement – allows you to disable the creation of background reinforcement in a particular slab, regardless of all other reinforcement groups.
In all other groups, the checkbox Create reinforcement performs the same function - allows you to disable the reinforcement of a particular group in the current slab.
If the Number of the background reinforcement meshes is set to 1, then creating a frame along the contour and the frame of the holes will be impossible!
For background reinforcement, you can specify the orientation of the bottom mesh - co-directional or mirrored. The co-directional option cannot be used if all background reinforcement is created by a single instance of "Area Reinforcement".
You can create background reinforcement with both Individual rebars and Area Reinforcement. If you select Area Reinforcement, you can create in four ways:
- Use Area Reinforcement for Each direction in each mesh (i.e., with two meshes, four Area Reinforcement elements will be created).
- Use Area Reinforcement for Each direction (i.e., with two meshes, two Area Reinforcement elements will be created).
- Use Area Reinforcement for Each mesh (i.e., with two meshes, two Area Reinforcement elements will be created).
- Use Area Reinforcement for Total background reinforcement. In this case, one Area Reinforcement element will be created.
For created instances of "Area reinforcement" you can specify the size from the drop-down list. It is also possible to translate the values of string parameters of "Area reinforcement" into rebars.
In all groups of reinforcement settings there is a button Parameters, clicking on which opens a dialog box for setting values of text parameters for the created reinforcement. The list of parameters is filled with the current document:
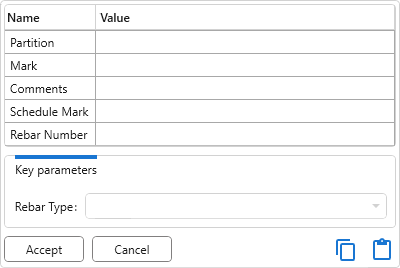
If the current document contains rebars with key parameters, a corresponding section will appear at the bottom of the dialog box, allowing you to select key parameter values from a dropdown list.
If the background reinforcement is created using Area Reinforcement, you can fill in both the values of the "Area Reinforcement" parameters and the values of the rebar parameters.
For the longitudinal and transverse reinforcement of the upper mesh it is necessary to specify the type, diameter and form of rebar bars, step and the offset of the outermost rod from the edge of the slab. It is also possible to add the creation of a filler rod at the edge of the slab (only on the outer edges) using the corresponding option.
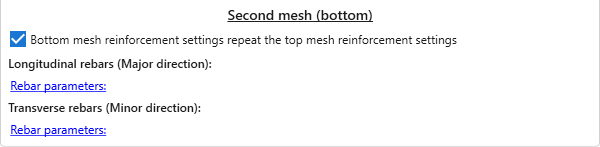
The settings for the longitudinal and transverse reinforcement of the bottom mesh can be set identical to those of the top mesh using the option Bottom mesh reinforcement settings repeat the top mesh reinforcement settings. In this case, the values of the rebar parameters will not be duplicated.
The main settings for reinforcement, as well as settings for background reinforcement, are taken into account when creating all other types of reinforcement, regardless of whether background reinforcement is created.
REINFORCEMENT OF ENDS
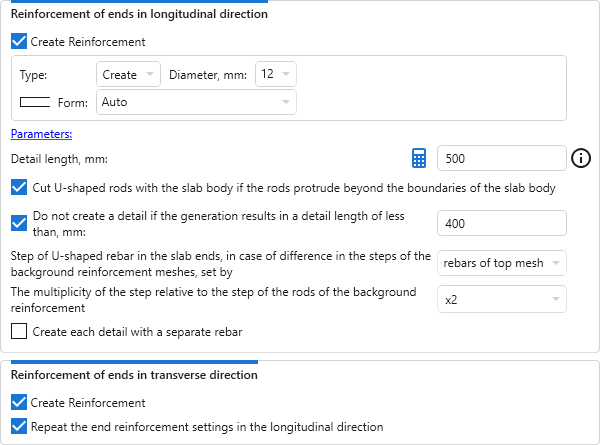
Reinforcement of ends is carried out by creating U-shaped rebars with a background reinforcement step. Ends can be reinforced either completely, only longitudinally or only transversely using the option Create Reinforcement in the corresponding sections of the settings group.
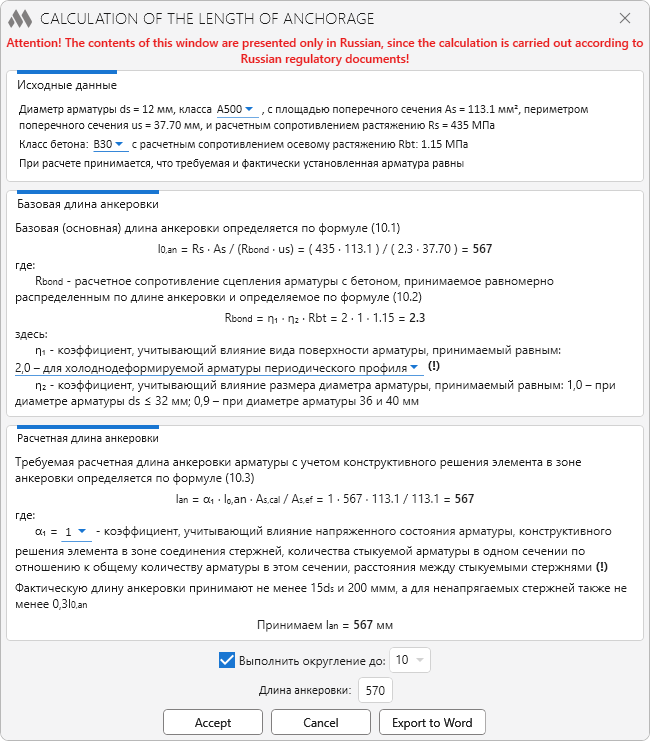
Detail length can be calculated by pressing  – a window will open with calculation of the length of the rod or the length of the anchoring according to SP 52-101-2003:
If U-shaped rods protrude beyond the slab body, they can be cut with the slab body by enabling the corresponding option of the group settings.
The option to limit the generated length is available below – if after generating the rod its length turns out to be less than the specified length, the rod will not be created.
In case of differences in the steps of the background reinforcement meshes, it is necessary to select in the drop-down list how the U-shaped rebars step will be set by: rebars of top mesh or rebars of bottom mesh. It is also possible to set the Multiplicity of the step relative to the step of the rods of the background reinforcement (x1, x2 or x3) and to enable the option to Create each detail with a separate rebar.
Reinforcement of ends settings in transverse direction can be set differently from Reinforcement of ends settings in longitudinal direction by unchecking Repeat the end reinforcement settings in longitudinal direction checkbox.
Framing holes
The framing of the holes depends on the results of the analysis of the geometry of the slab. Highest Success Rate for Rectangular and Round Holes.
Holes with sizes up to 300 mm are not framed. It is not possible to specify reinforcement for such holes and include them in machining.
Holes with sizes up to 300 mm are grouped and processed as one if the distance between the boundaries of such holes is less than 100 mm.
The settings are specified for the hole selected in the hole list in the left part of the plugin window.
If you put the mouse cursor over the settings group of the Framing Holes tab, a pop-up window with the framing hole scheme appears, where the rebars whose settings are set in this group are highlighted in red.
Straight rods in the longitudinal direction. Straight bars in the transverse direction
The settings for creating straight rods are set separately for longitudinal and transverse directions:
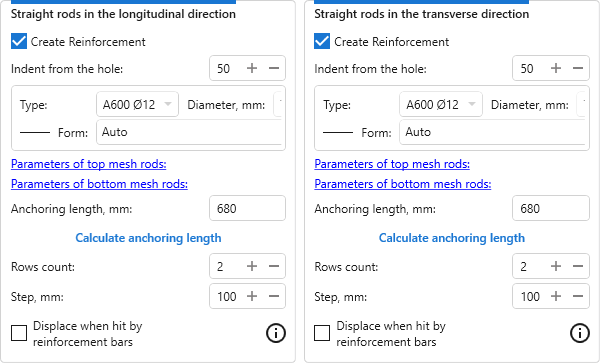
Indent from the hole: – set from the edge of the hole to the middle of the reinforcing bar.
Up to three rows of straight rods can be specified (each row has 2 rods "along" the hole). For the first row (closest to the hole) it is possible to enable checking and displacement when background reinforcement hits the rods, but this does not guarantee correct displacement of the rods from the second and third rows.
LONGITUDINAL TIED STIRRUPS. TRANSVERSE TIED STIRRUPS
To be able to create tied stirrups in the longitudinal direction, you must enable the creation of at least two rows of straight bars in the longitudinal direction with the option Displace when hit by reinforcement bars disabled in the previous group of settings. Similarly for tied stirrups in transverse direction.
Settings for creating tied stirrups are set separately for longitudinal and transverse directions:
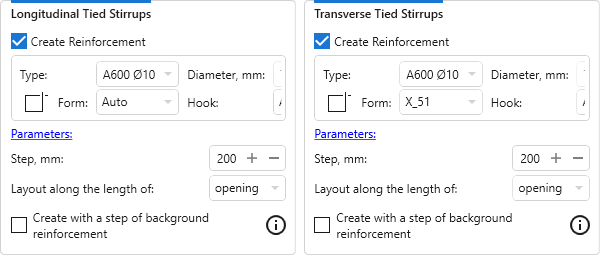
For shapes with hooks, you can additionally select the hook type from the Hook drop-down list. The list of hook types available for selection will depend on the settings of General Reinforcement Settings of the current document.
The "Include hooks in Rebar Shape definition" option can only be changed before the first rebar is created in the current document.
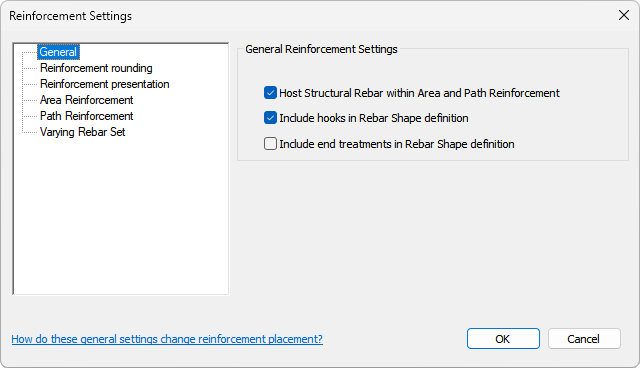
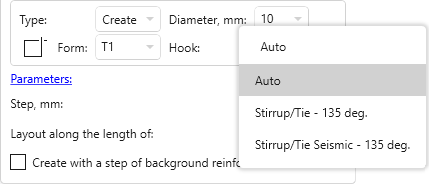
If the "Include hooks in Rebar Shape definition" option is enabled, only hook types with an angle suitable for the selected shape are included in the list of hooks.
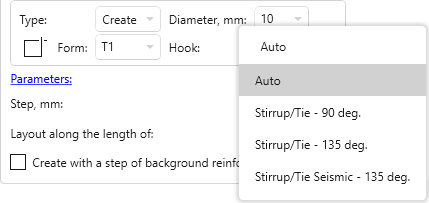
If the above option is disabled, the list of hooks will include all types of hooks available for the selected shape.
For the tied stirrups you can select Layout along the length of opening or straight bars. Layout of the tied stirrups in longitudinal direction along the length of the straight rods:
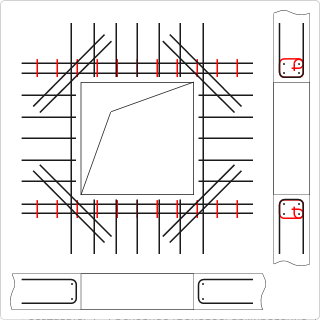
Create with a step of background reinforcement – when this option is enabled, the tied stirrups will be created with the rod tep of the top mesh of the background reinforcement. If the background reinforcement is not created in the slab, the tied stirrups will be created with the specified step.
U-shaped rods in the longitudinal direction. U-shaped rods in the transverse direction
The settings for creating U-shaped rods are set separately for longitudinal and transverse directions:
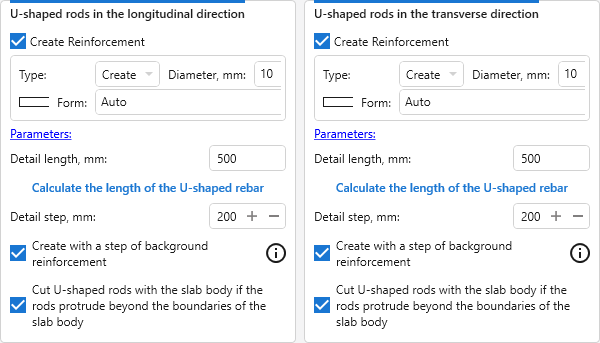
If U-shaped rods protrude beyond the slab body, they can be cut with the slab body by enabling the corresponding option of the group settings.
Diagonal reinforcement
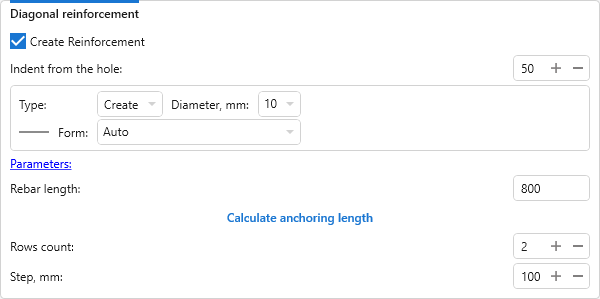
Indirect reinforcement is performed at 45 degrees to the outer corners of the hole. When calculating the anchoring length, the length of the rods is specified as two anchoring lengths.

 YouTube